Configure a just-in-time access request
A just-in-time (JIT) access request puts an application behind an approval: the user no longer launches it directly, they request it, and an administrator grants the access — optionally for a single use, for a time window, or for a limited session duration.
This is the mechanism to use on the resources whose every access must be decided rather than granted once and for all.
How the mechanism fits together
- In an access policy, some of the applications granted to a group are marked as restricted.
- On the portal, those applications appear but cannot be launched: the user sends a request.
- In the Workflow module, the administrator accepts or refuses it. Accepting creates a workflow, that is the actual authorisation, with its restrictions.
- The user launches the application within the limits of that workflow.
Restricting is done in the access policy, granting in the Workflow module
The two modules are not interchangeable: Access Policies decides which applications are subject to a request, Workflows answers the requests. An application that is not restricted there never produces any request.
Step 1 — Place the applications behind a workflow
Open the Access Policies module and edit — or create — the contract covering the users concerned. Go through its tabs in order: the user groups, the site giving access to the resources, then the applications published to those users.
In the Applications to restrict tab, move the applications whose access must be approved into the restricted list.
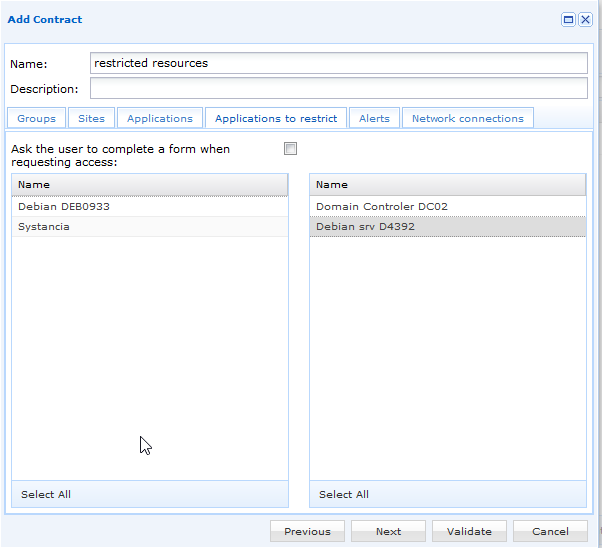
| Option | What it does |
|---|---|
| Applications to restrict | Two-column list. What you move to the right becomes subject to a request. |
| Ask the user to complete a form when requesting access | Asks the user to document their request. The answers are shown to the administrator when the request is handled. |
Click Validate.
Only what was already granted can be restricted
The list offers the applications selected earlier in the same contract: restricting is a narrowing of an access already granted, not a way to grant one.
Step 2 — What the user sees
On the portal, a restricted application is displayed but locked. Clicking it opens the request instead of launching the application — with the form to fill in, if the option was ticked in step 1.
The user then waits for the administrator's answer. Once the access is granted, the application becomes launchable within the limits set by the workflow.
Step 3 — Answer the request
Open the Workflow module and go to the Users request tab. Select the waiting request, then click Accept the request or Refuse the request.
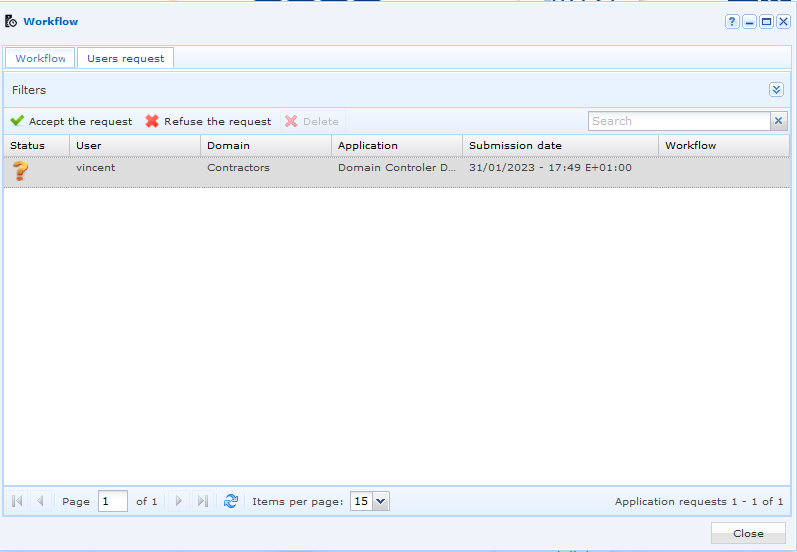
Accepting opens a window pre-filled with the user, their domain and the requested resource.
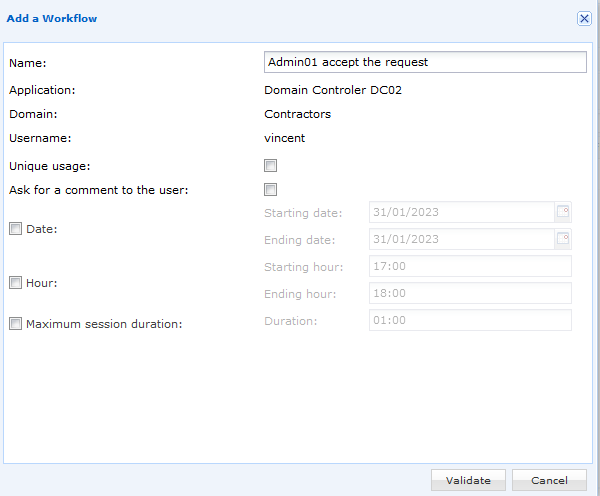 Beyond naming the workflow, it is where the restrictions are set, and they stack:
| Restriction | What it limits |
|---|---|
| Unique usage | The application can be launched only once. A further access means a further request. |
| Mandatory comment | The user states a reason before launching. The comment is then displayed with the session recording. |
| Date | The date range within which the application can be opened. |
| Hour | The time window within which it can be opened. |
| Maximum session duration | How long the session may last before it is closed. |
Validating without any restriction produces an authorisation with no time limit, and the console asks for an extra confirmation before creating it — which is the moment to check that this is really what was intended.
The exhaustive behaviour of the two tabs, of the refusal and of the deletions is described in Workflows.
Deleting a workflow revokes the access
Deleting a workflow removes the authorisation: the user has to submit a new request. Obsolete workflows — expired dates, exhausted single use, session duration reached — are deleted by the system on their own.
Step 4 — Be notified of incoming requests
By default, no email warns the administrator that a request has been submitted. Until a notification is set up, the requests have to be looked for in the console.
To be notified:
- Have an SMTP server available in the SMTP servers module.
- In the Notification profiles module, create a profile: the SMTP server, the sender and the recipients, then, in the Settings tab, tick the Application access requests option.
- Ticking that option activates the Applications tab: open it, tick the applications concerned, then validate.