Connector execution
There are several methods for running a provisioning sequence:
- Using Batch or PowerShell files with command lines that call the HPPRunCli executable
- Using the job management interface
- Using SIP web services
Executing provisioning sequences with HPPRUNCLI.exe
In a Batch or PowerShell file, you must call the HppRunClie.exe executable followed by the following options:
| Options | Function | Mandatory (Y/N) |
|---|---|---|
| -sec [Sequence Name] | Option to specify the sequence to be executed. | Y |
| -cfg [Config_file_name] | Option to specify the configuration file to use. | N. By default, the hpp.ini file is used. |
| -obj [Val_attribute1|Val_attribute2|…] | Option to specify the matching attribute value to execute the sequence as a unit. If several attribute values must be specified, they must be listed in the order in which the exports must be executed. | N |
| -seq [Directory_nm] | Option to specify the name of the output directory for log files. | N |
Running provisioning sequences via the job management interface
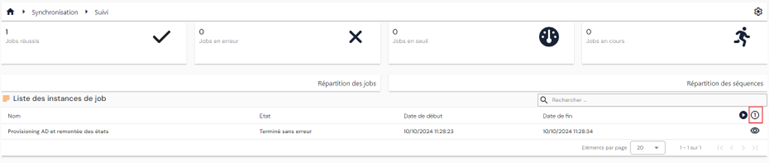
From the provisioning sequence job instance viewing page, you can run a job either individually or in bulk.
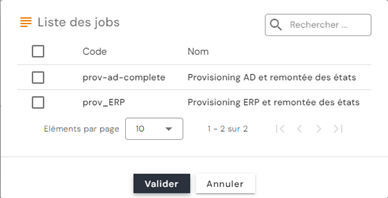
To launch a job in bulk, click on the “ ” button.
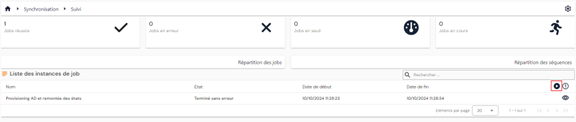
Select the desired job(s), then click on “Validate” to place the jobs in the queue.
To launch a job individually, click on the “ ” button.
Select the desired job, then enter the value to select the object on which you want to run the job.
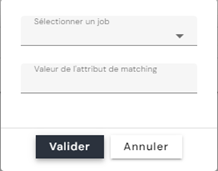
Warning: Currently, if your job contains multiple sequences, in order to run a job in unit mode, the matching attribute must have the same value for all sequences.
Running provisioning sequences via SIP web services
Example of a script for running a provisioning job via a PowerShell script:
1 2 3 4 5 6 7 8 9 10 11 12 13 14 15 16 17 18 19 20 21 22 23 24 25 26 27 28 29 30 31 32 33 34 35 36 37 38 39 40 41 42 43 44 45 | |
Similarly, to restart a provisioning job that has been stopped due to an import threshold using a PowerShell script, you need to retrieve the job instance ID by calling the /scim/v2/job-instance/ route (GET method).
For more information, see the Swagger documentation: https://[SIP_Server_URL]:44355/swagger/
Running the new upstream feed connector (from 7.0 SP3)
From version 7.0 SP3 onwards, it is possible to assign roles and/or permissions to identities via a new upstream feed connector.
Identities – Roles and Identities/Roles – Authorizations links created and/or deleted from an authoritative source are managed by a new type of link in the database. Thus, exporting Identities – Roles and Identities/Roles – Authorizations links from the Identity repository will only return roles and authorizations assigned by SIP.
Configuring an Identities - Roles link connector
To configure an Identities - Roles link connector, you must create at least:
- An export from an authoritative source that must contain the following information:
- Identity UID (required)
- Role code to be assigned (required) – single value.
- Role start date (optional)
- Role end date (optional)
- An export of the Identity repository of type PERSON_ROLES in which you must specify the types of persons and the codes of the repositories for which you want to create identity-role links.
- A synchronization rule to define the Matching, Creation, Modification, and Deletion operations
- In the Matching rule, compare the identity uid and the role code
- In the creation rule, it is mandatory to specify the identity uid and the role code. The start and end dates are optional
- In the modification rule, it is mandatory to specify the ID of the person-role link, retrieved from the Identity repository export. Only the dates can be modified
- In the deletion rule, it is mandatory to specify the ID of the person-role link, retrieved from the Identity repository export.
- Syntax of Identity codes to be used in synchronization rules:
- person = UID of the identity
- role = role code
- startdate = start date of the role
- enddate = end date of the role
- id = ID of the identity-role link (id field in the sid.PersonRoles table)
- An import into the Identity repository of type PERSON_ROLES. You can check the option to disable on-the-fly account calculation in order to manage import time in the event of large volumes. If the option has been enabled, you must perform an ACCOUNTCALC import to recalculate the accounts in the affected repository.
Configuring an Identities - Roles link connector
- An export from an authoritative source that must contain the following information:
- Identity UID (required)
- Role code (required) – single value.
- Authorization code to assign to the identity/role link (required) – single value
- Authorization start date (optional)
- Authorization end date (optional)
Attention
The Identity/Role link must already exist for the Identity/Role – Authorisations link connector to function correctly
- An export of the Identity repository of type PERSON_RIGHTS in which you must specify the types of persons and the codes of the repositories for which you want to create identity/role-authorization links.
- A synchronization rule to define the Matching, Creation, Modification, and Deletion operations
- In the Matching rule, compare the identity uid, role code, and authorization code.
- In the creation rule, it is mandatory to specify the identity uid, role code, and authorization code. The start and end dates are optional
- In the modification rule, it is mandatory to specify the ID of the person/role - authorization link, retrieved from the Identity repository export. Only dates can be modified.
- In the deletion rule, it is mandatory to specify the ID of the person/role - authorization link, retrieved from the Identity repository export.
- Syntax of Identity codes to be used in synchronization rules:
- person = UID of the identity
- role = role code
- right = authorization code
- startdate = authorization start date
- enddate = authorization end date
- id = identity-role-right link ID (id field in the sid.PersonRights table)
- An import into the Identity repository of type PERSON_RIGHTS. You can check the option to disable on-the-fly account calculation in order to manage import time in the event of large volumes. If the option has been enabled, you must perform an ACCOUNTCALC import to recalculate the accounts in the affected repository.
Enabling traces
As of version 7.1, traces for the provisioning engine are no longer enabled in the registry but in the [Installation_Directory]\SIP\Config.ini file.
Note
This file is the provisioning engine's file. It must not be confused with the connector configuration files (*.ini), passed to HPPRunCli with the -cfg option.
In the General section, add the following three parameters:
traceLevel:0to disable traces,2FFFFto enable them.traceModule: list of modules to trace, separated by commas. Module names are not case-sensitive. The possible values are:HPPCfgHPPCSVHPPHPHPPLDAPHPPReferenceHPPRunCliHPPSQLSIPSCIMSIPLDAPWrapperDLLAll, to enable traces for all modules
traceOutputDir: output directory for the logs. This parameter is optional: if it is not specified, the logs are generated in the user's%tmp%folder.
Example:
1 2 3 4 | |
Note
The version 7.1 installer already writes these three parameters to Config.ini, with traces disabled: traceLevel=0, traceModule filled in with the complete list of modules, and traceOutputDir=C:\Temp. To enable traces, you therefore only need to modify traceLevel. Check that the account that runs the engine can write to the output directory.
Tip
For a targeted diagnosis, reduce traceModule to the relevant modules only — for example SIPSCIM for a connection problem with a SCIM target. Once the diagnosis is complete, set traceLevel back to 0: detailed traces consume disk space and slow down processing.
Encryption of passwords and the client secret
As of version 7.1, the passwords and “client secrets” used by the provisioning engine and present in the [Installation_Directory]\SIP\Config.ini file are encrypted.
During a first installation, this data is saved automatically according to the parameters entered in the installer.
To modify either of these two values manually, use the [Installation_Directory]\SIP\SIPEncrypt.exe executable. From a command prompt or a PowerShell window, run SIPEncrypt.exe followed by the password or client secret to encrypt, then copy the result into the Config.ini file.
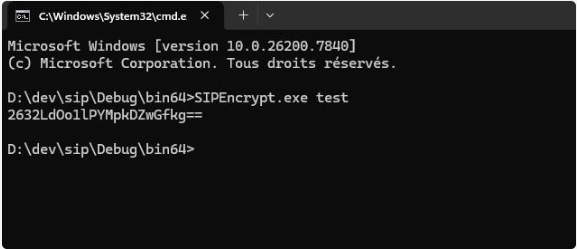
SIPEncrypt.exe expects a single parameter. Without a parameter, or with several, it displays the message SIPEncrypt should be called with a single input parameter. and produces nothing. If the value contains spaces or characters interpreted by the command prompt (&, |, ^, ", $…), enclose it in quotation marks — preferably single quotes in PowerShell.
The client secret is entered in the clientSecret parameter of the Config.ini file.
Attention
For authentication with SCIM targets, the engine uses as is any password or client secret that it cannot decrypt. A value accidentally left in plain text therefore works without any warning message, while the secret is exposed in the file. Check that each secret in Config.ini is indeed a value produced by SIPEncrypt.exe.
This encryption is reversible, since the engine decrypts the values itself: it protects against reading the secret in plain text, not against access to the file. Restrict access to Config.ini to administration accounts and to the account that runs the engine. When typed on the command line, the plain-text value may also remain in the console history: close the session after use.