Installation of the Edge Gateway Server
Initial system settings
When the Edge Gateway Cluster appliance is started for the first time, an initial machine configuration wizard appears. This wizard allows you to initialize the system-specific configuration as well as those specific to the use of CyberElements Bastion.
Systems settings
The wizard begins by asking you to select a language: 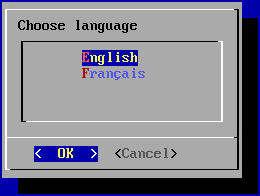
Information
The language you choose will affect both the system display language and the keyboard layout. In English, the keyboard will have a QWERTY layout, while in French it will be AZERTY.
The wizard then asks you to add a new password for the root system account (make sure it meets the required complexity): 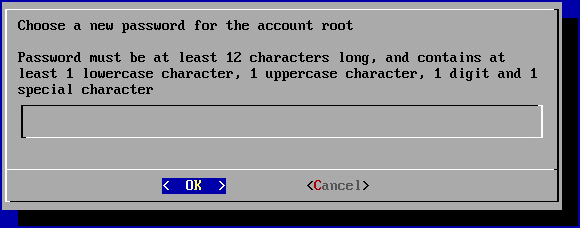
Next, you need to change the systancia system user account password (make sure it meets the required complexity): 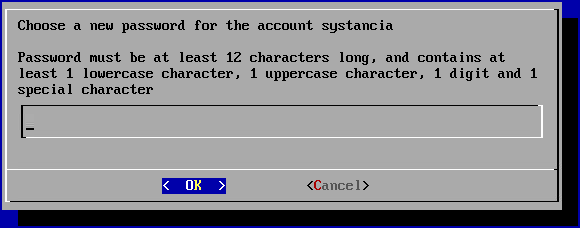
Finally, you need to enter the machine name: 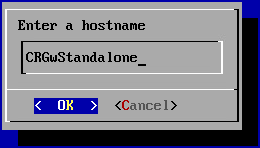
Network settings
Once the system settings have been applied, the wizard switches to the machine's network settings.
The first panel asks you to choose between a static configuration and a dynamic configuration via DHCP: 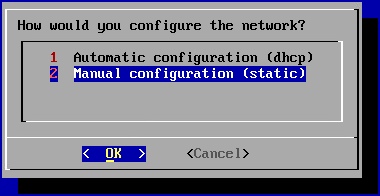
Recommendation
It is recommended that you use a static configuration for the machine's network settings, particularly for the direct access feature.
DHCP can also be used if the IP address is set at the DHCP server level.
If the static configuration is chosen, the wizard will ask for the following network settings: 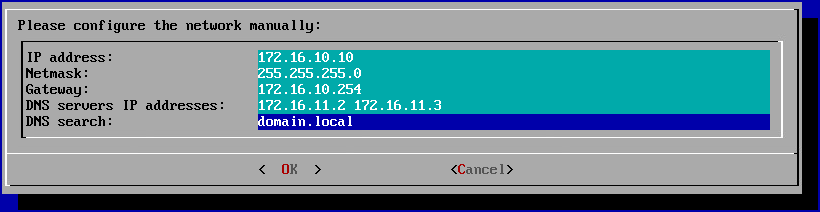
Tip
Several DNS servers can be entered (3 maximum) by separating them with spaces. Similarly, several DNS suffixes can be added by separating them with a space.
Finalizing the initial settings
The initial configuration menu now prompts you to continue with the Edge Gateway pairing mechanism.
For this documentation, it will not be used, so it is necessary to disable the appearance of this menu at login and disable auto-connection to root.
To do this, start by exiting the initial configuration menu, either by selecting the Cancel button or by using the Ctrl+C key combination.
Then execute the following commands:
1 2 3 4 | |
Settings specific to CyberElements Bastion operation
Once the network settings have been applied, you still need to connect the Edge Gateway and HTML5 Gateway instances to the Mediation Controllers.
To do this, the first Edge Gateway and HTML5 Gateway instances will connect to the MASTER Mediation Controller, while the second instances will connect to the SLAVE Mediation Controller.
Attention!
If the Edge Gateway installation is not located within the LAN and therefore the addresses RIP_MED_SSL_MASTER and RIP_MED_SSL_SLAVE are not accessible (even with NAT).
In that case, you will only need to configure the first instance of Edge Gateway and HTML5 Gateway, which will be set up to connect to VIP_MED_SSL.
In this context, the Standalone virtual appliance can be used. The Cluster virtual appliance is preconfigured with two instances, whereas its Standalone counterpart is preconfigured with a single instance.
Before continuing with the following instructions, make sure you have the following items:
- Certificate for the Edge Gateway and HTML5 Gateway instances to be connected
- Certificate for the recording service
- An SSH client (on Windows, you can use PuTTY)
- An SCP client (on Windows, the WinSCP or FileZilla tools can be used)
Transfer the certificates to the /tmp/ directory of the machine.
Connecting Edge Gateways
Copy the certificate file from the Edge Gateway to the /etc/ipdiva/gateway/ssl/ and /etc/ipdiva/gateway-slave/ssl/ directories. You can do this by running commands similar to the following as root (replace <CERT_NAME> with the name of the certificate for the Edge Gateway):
1 2 | |
Configure the Edge Gateway instances to allow them to connect to the Mediation Controllers.
The configurations differ depending on the Mediation Controller to be contacted. Perform both settings:
Edit the file /etc/ipdiva/gateway/gateway.xml and fill it in using the following information (several sections have been omitted and are indicated by […]):
1 2 3 4 5 6 7 8 9 10 | |
Replace the following elements:
_FILL_ME_WITH_SERVER_ADDRESS_:: must be replaced with theRIP_MED_SSL_MASTERaddress, the:character, and the SSL router's listening port, which is normally set to443keyfile.pem: must be replaced with the name of the certificate filePASSWORD: must be replaced with the certificate password
Example
Taking into account the following information:
RIP_MED_SSL_MASTERequals:10.0.10.11- SSL Router listening port:
443 - Certificate file name:
edge-gateway.p12 - Certificate password:
Str0ngP@ssw0rd
The /etc/ipdiva/gateway/gateway.xml file would be configured as follows:
1 2 3 4 5 6 7 8 9 10 | |
Complete file
1 2 3 4 5 6 7 8 9 10 11 12 13 14 15 16 17 18 19 20 21 22 23 24 25 26 27 28 29 30 31 32 33 34 35 36 37 38 39 40 41 42 43 44 45 46 47 48 49 50 51 52 53 54 55 56 57 58 59 60 61 62 63 64 65 66 67 68 69 70 71 72 73 74 75 76 77 78 79 80 81 | |
Finally, start the Edge Gateway instance to load the new settings and connect it to the MASTER Mediation Controller:
1 | |
Edit the /etc/ipdiva/gateway-slave/gateway.xml file and complete it using the following information (several sections have been omitted and are indicated by […]):
1 2 3 4 5 6 7 8 9 10 11 12 | |
Replace the following elements:
@SERVER@: must be replaced with the addressRIP_MED_SSL_SLAVE@SERVERPORT@: must be replaced with the SSL router's listening port, normally set to443keyfile.pem: must be replaced with the name of the certificate filePASSWORD: must be replaced with the certificate password@RPC_PORT@: must be replaced with an available TCP port on the machine; port9081is commonly used
Example
Taking into account the following information:
RIP_MED_SSL_SLAVEis equal to:10.0.10.13- SSL Router listening port:
443 - Certificate file name:
edge-gateway.p12 - Certificate password:
Str0ngP@ssw0rd - Available RPC port:
9081
The /etc/ipdiva/gateway-slave/gateway.xml file would be configured as follows:
1 2 3 4 5 6 7 8 9 10 11 12 | |
Complete file
1 2 3 4 5 6 7 8 9 10 11 12 13 14 15 16 17 18 19 20 21 22 23 24 25 26 27 28 29 30 31 32 33 34 35 36 37 38 39 40 41 42 43 44 45 46 47 48 49 50 51 52 53 54 55 56 57 58 59 60 61 62 63 64 65 66 67 68 69 70 71 72 73 74 75 76 77 78 79 80 81 | |
Finally, start the Edge Gateway instance to load the new settings and connect it to the SLAVE Mediation Controller:
1 | |
Configuration of the recording service
Move the certificate for the recording service to the /etc/ipdiva/careserver/ directory with a command similar to this (replace <CERT_NAME> with the name of the intended certificate):
1 | |
Next, configure the service by modifying the following file: /etc/ipdiva/careserver/careserver.xml. The configuration of the file should be something like this (the following section omits many lines in the file marked with […]):
1 2 3 4 5 6 7 8 9 10 11 12 13 14 15 | |
Make the following changes:
- Change the listening IP address of the recording service to
0.0.0.0(listens on all available IP addresses) - Replace
recording_service.p12with the name of the certificate for the recording service - Replace
PASSWORDwith the password for the recording service certificate - Add the line
<element>http://127.0.0.1:9081</element>
Example
Taking into account the following information:
- Certificate file name:
fqdn.edge-gateway.local.p12 - Certificate password:
Str0ngP@ssw0rd
The file /etc/ipdiva/careserver/careserver.xml would be configured as follows:
1 2 3 4 5 6 7 8 9 10 11 12 13 14 15 | |
Complete file
1 2 3 4 5 6 7 8 9 10 11 12 13 14 15 16 17 18 19 20 21 22 23 24 25 26 27 28 29 30 31 | |
Validate the new settings by restarting the recording service:
1 | |
Connecting HTML5 Gateway instances
If the HTML5 Gateway instance needs to be configured, run the following command on the Edge Gateway server as root to enable automatic startup of the instance:
1 | |
Copy the certificate file from the HTML5 Gateway to the /etc/ipdiva/html5gateway/ssl/ and /etc/ipdiva/html5gateway-slave/ssl/ directories. You can do this by running commands similar to the following as root (replace <CERT_NAME> with the name of the certificate for the HTML5 Gateway):
1 2 | |
Configure the HTML5 Gateway instances to allow them to connect to the Mediation Controllers.
The configurations differ depending on the Mediation Controller to be contacted. Perform both settings:
Edit the /etc/ipdiva/html5gateway/html5gateway.xml file and complete it using the following information (several sections have been omitted and are indicated by […]):
1 2 3 4 5 6 7 8 9 10 | |
Replace the following elements:
_FILL_ME_WITH_SERVER_ADDRESS_:: must be replaced with theRIP_MED_SSL_MASTERaddress, the:character, and the SSL router's listening port, which is normally set to443keyfile.pem: must be replaced with the name of the certificate filePASSWORD: must be replaced with the certificate password
Example
Taking into account the following information:
RIP_MED_SSL_MASTERequals:10.0.10.11- SSL Router listening port:
443 - Certificate file name:
html5-gateway.p12 - Certificate password:
Str0ngP@ssw0rd
The /etc/ipdiva/html5gateway/html5gateway.xml file would be configured as follows:
1 2 3 4 5 6 7 8 9 10 | |
Complete file
1 2 3 4 5 6 7 8 9 10 11 12 13 14 15 16 17 18 19 20 21 22 23 24 25 26 27 28 29 30 31 32 33 34 35 | |
Finally, restart the HTML5 Gateway instance to load the new settings and connect it to the MASTER Mediation Controller:
1 | |
Edit the /etc/ipdiva/html5gateway-slave/html5gateway.xml file and complete it using the following information (several sections have been omitted and are indicated by […]):
1 2 3 4 5 6 7 8 9 10 11 12 | |
Replace the following elements:
@SERVER@: must be replaced with the addressRIP_MED_SSL_SLAVE@SERVERPORT@: must be replaced with the SSL router's listening port, normally set to443keyfile.pem: must be replaced with the name of the certificate filePASSWORD: must be replaced with the certificate password@RPC_PORT@: must be replaced with an available TCP port on the machine; port9089is commonly used
Example
Taking into account the following information:
RIP_MED_SSL_SLAVEis equal to:10.0.10.13- SSL Router listening port:
443 - Certificate file name:
html5-gateway.p12 - Certificate password:
Str0ngP@ssw0rd - Available RPC port:
9089
The /etc/ipdiva/html5gateway-slave/html5gateway.xml file would be configured as follows:
1 2 3 4 5 6 7 8 9 10 11 12 | |
Complete file
1 2 3 4 5 6 7 8 9 10 11 12 13 14 15 16 17 18 19 20 21 22 23 24 25 26 27 28 29 30 31 32 33 34 35 | |
Finally, restart the HTML5 Gateway instance to load the new settings and connect it to the SLAVE Mediation Controller:
1 | |
Configurations prior to connecting HTML5 Gateways
In order for HTML5 applications to work, additional settings must be configured on the Mediation Controller servers. Log in to the MASTER and SLAVE Mediations Controllers servers as root.
Create or edit the /etc/ipdiva/httpd/commonParameters.extra.conf file to add a section equivalent to the following for the HTML5 Gateway:
1 2 3 4 5 6 7 8 9 10 11 12 13 14 15 16 17 18 19 20 21 | |
Where:
URL_HTML5must be replaced with the content of theURLfield for the HTML5 Gateway configured in the administration console during the HTML5 Gateway declaration (for a cluster, this is generallyHTML5-1andHTML5-2).GW_NAMEmust be replaced by the name of an Edge Gateway located on the same server as the HTML5 Gateway. The | character at the end of the line must be kept.ORGANIZATION_NAMEmust be replaced by the name of the organization to which the previous Edge Gateway connects.
Example
For a platform with the following settings:
- Organization name:
my-organization-name - Declaration of the first HTML5 Gateway in the administration console:
- Name:
html5-gateway-1 - URL:
HTML5-1 - Protocol:
WebSocket
- Name:
- Declaration of the second HTML5 Gateway in the administration console:
- Name:
html5-gateway-2 - URL:
HTML5-2 - Protocol:
WebSocket
- Name:
- An Edge Gateway server on the first HTML5 Gateway has:
- An Edge Gateway service named
edge-gateway-1 - An HTML5 Gateway service named
html5-gateway-1
- An Edge Gateway service named
- An Edge Gateway server on the second HTML5 Gateway has:
- An Edge Gateway service named
edge-gateway-2 - An HTML5 Gateway service named
html5-gateway-2
- An Edge Gateway service named
The configuration file /etc/ipdiva/httpd/commonParameters.extra.conf created will be set up as follows:
1 2 3 4 5 6 7 8 9 10 11 12 13 14 15 16 17 18 19 20 21 22 23 24 25 26 27 28 29 30 31 32 33 34 35 36 37 38 39 40 41 42 43 | |
Before applying the new settings, you must check that the new configuration does not cause any blocking errors for the Apache2 web server.
To do this, run the following command:
1 | |
If the response is Syntax OK then the changes can be applied with the command below. Otherwise, check your configuration in the /etc/ipdiva/httpd/commonParameters.extra.conf file.
1 | |
Configuring an NTP time server
It is recommended to set up a time server to keep the system clock up to date. The necessary steps are described on the NTP configuration page.