Installation of the Edge Gateway Server
Note
As a reminder, switching to root on Debian machines must be done with the following command:
1 | |
Downloading the mirror and necessary tools
The CyberElements Cleanroom 4.6 mirror and the Systancia repository signature key can be downloaded from this link (requires the creation of a client account): Systancia Marketplace
In addition to the mirror and key, third-party tools will be required for the upgrade process:
- An SSH client (on Windows, you can use PuTTY)
- An SCP client (on Windows, the WinSCP or FileZilla tools can be used)
Use the SSH client to connect remotely to your server.
Use the SCP client to transfer files to your remote machine.
Preparing for installation
Configuration of the network
It is highly recommended to define a static network address for the Edge Gateway server. To do this, you first need to retrieve the name of your machine's network interface and its MAC address. Run the following command as root:
1 | |
This command displays the name of the network interface, its status, its MAC address, and the interface settings.
Example
After the command is executed, the following output is displayed:
1 | |
The name of the network interface is ens192 and its MAC address is 00:50:56:a1:56:9f.
Once the network interface name and MAC address have been obtained, it is now possible to edit the machine's network configuration.
Edit the /etc/network/interfaces file to modify it using the following template:
1 2 3 4 5 6 7 8 9 10 11 12 13 14 15 16 17 18 19 20 21 22 | |
Where:
INTERFACE_NAMEmust be replaced by the name of the network interface previously retrieved.MAC_ADDRESSmust be replaced with the MAC address previously retrieved.IP_GWmust be replaced with the server's IP address.NETMASKmust be replaced by the network mask associated with the IP address.NETWORK_GATEWAYmust be replaced by the default network gateway.IP_DNSmust be replaced by the IP address of the DNS server. If several servers need to be configured (3 maximum), separate them with a space.DNS_SUFFIXmust be replaced by the DNS suffix to be used. If no suffix needs to be entered, delete the line.
Example
1 2 3 4 5 6 7 8 9 10 11 12 13 14 15 16 17 18 19 20 21 22 | |
Before applying the configuration, there are three more steps to complete.
The first is to install packages resolvconf and bridge-utils so that the DNS configuration specified in the previous file can be applied and the br0 interface can be used:
1 | |
The second is to check the configuration of the /etc/hosts file with regard to the machine's primary IP address (IP_GW).
To do this, edit the /etc/hosts file and check that the second line is in the following format:
2 | |
Example
If the machine is named EDGE-GATEWAY without belonging to a domain and its IP address IP_GW is 172.16.10.10, then the file would be completed as follows:
2 | |
If the machine belongs to the DOMAIN.LOCAL domain, then the file would be completed as follows:
2 | |
Attention!
An incorrect configuration of the file may cause an error when installing the collectd package.
All that remains is to restart the server:
1 | |
Configuring the APT package manager
Upload the files downloaded from the Systancia Marketplace to the /tmp/ directory on the server using an SCP client:
systancia.gpgcleanroom-4.6.1-build33.1096.D12-full.tgz
Log in to the server as root, then run the following commands to unzip the Systancia repository, configure its use in APT, and authenticate it.
1 2 3 4 5 | |
We strongly recommend disabling the installation of unnecessary packages when running apt commands. To do so, run the following command:
1 | |
Installation of the CyberElements Bastion Edge Gateway server
Installation of basic components
Start installing the components using the following command as root:
1 | |
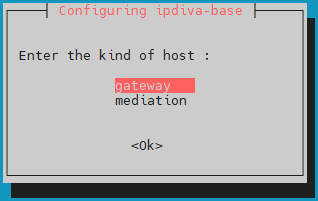
After downloading all dependencies, a window will open asking you to select the server type. Select gateway:
What should I do if there is an error?
If there is an error in the information you entered, continue installing the ipdiva-base package and then use the following command to reconfigure the server:
1 | |
Instalation of Edge Gateway components
Next, start the installation of the Edge Gateway-specific components using the following command:
1 | |
The Edge Gateway server components are now installed. All that remains is to restart the machine so that the newly installed components can initialize:
1 | |
Installation of HTML5 Gateway components
Use the following command to start installing the HTML5 Gateway components on the Edge Gateway server:
1 | |
Use the following command lines to enable and configure the file transfer and virtual printer features:
1 2 3 | |
Settings specific to CyberElements Bastion operation
Once the network settings have been applied, you still need to connect the Edge Gateway and HTML5 Gateway instances to the Mediation Controllers.
To do this, the first Edge Gateway and HTML5 Gateway instances will connect to the MASTER Mediation Controller, while the second instances will connect to the SLAVE Mediation Controller.
Attention!
If the Edge Gateway installation is not located within the LAN and therefore the addresses RIP_MED_SSL_MASTER and RIP_MED_SSL_SLAVE are not accessible (even with NAT).
In that case, you will only need to configure the first instance of Edge Gateway and HTML5 Gateway, which will be set up to connect to VIP_MED_SSL.
In this context, the Standalone virtual appliance can be used. The Cluster virtual appliance is preconfigured with two instances, whereas its Standalone counterpart is preconfigured with a single instance.
Before continuing with the following instructions, make sure you have the following items:
- Certificate for the Edge Gateway and HTML5 Gateway instances to be connected
- Certificate for the recording service
- An SSH client (on Windows, you can use PuTTY)
- An SCP client (on Windows, the WinSCP or FileZilla tools can be used)
Transfer the certificates to the /tmp/ directory of the machine.
Creation of instances to connect to the SLAVE Mediation Controller
Run the following commands as root to declare a new instance of Edge Gateway and HTML5 Gateway that will be used to connect to the SLAVE Mediation Controller:
1 2 | |
Connecting Edge Gateways
Copy the certificate file from the Edge Gateway to the /etc/ipdiva/gateway/ssl/ and /etc/ipdiva/gateway-slave/ssl/ directories. You can do this by running commands similar to the following as root (replace <CERT_NAME> with the name of the certificate for the Edge Gateway):
1 2 | |
Configure the Edge Gateway instances to allow them to connect to the Mediation Controllers.
The configurations differ depending on the Mediation Controller to be contacted. Perform both settings:
Edit the file /etc/ipdiva/gateway/gateway.xml and fill it in using the following information (several sections have been omitted and are indicated by […]):
1 2 3 4 5 6 7 8 9 10 | |
Replace the following elements:
_FILL_ME_WITH_SERVER_ADDRESS_:: must be replaced with theRIP_MED_SSL_MASTERaddress, the:character, and the SSL router's listening port, which is normally set to443keyfile.pem: must be replaced with the name of the certificate filePASSWORD: must be replaced with the certificate password
Example
Taking into account the following information:
RIP_MED_SSL_MASTERequals:10.0.10.11- SSL Router listening port:
443 - Certificate file name:
edge-gateway.p12 - Certificate password:
Str0ngP@ssw0rd
The /etc/ipdiva/gateway/gateway.xml file would be configured as follows:
1 2 3 4 5 6 7 8 9 10 | |
Complete file
1 2 3 4 5 6 7 8 9 10 11 12 13 14 15 16 17 18 19 20 21 22 23 24 25 26 27 28 29 30 31 32 33 34 35 36 37 38 39 40 41 42 43 44 45 46 47 48 49 50 51 52 53 54 55 56 57 58 59 60 61 62 63 64 65 66 67 68 69 70 71 72 73 74 75 76 77 78 79 80 81 | |
Finally, start the Edge Gateway instance to load the new settings and connect it to the MASTER Mediation Controller:
1 | |
Edit the /etc/ipdiva/gateway-slave/gateway.xml file and complete it using the following information (several sections have been omitted and are indicated by […]):
1 2 3 4 5 6 7 8 9 10 11 12 | |
Replace the following elements:
@SERVER@: must be replaced with the addressRIP_MED_SSL_SLAVE@SERVERPORT@: must be replaced with the SSL router's listening port, normally set to443keyfile.pem: must be replaced with the name of the certificate filePASSWORD: must be replaced with the certificate password@RPC_PORT@: must be replaced with an available TCP port on the machine; port9081is commonly used
Example
Taking into account the following information:
RIP_MED_SSL_SLAVEis equal to:10.0.10.13- SSL Router listening port:
443 - Certificate file name:
edge-gateway.p12 - Certificate password:
Str0ngP@ssw0rd - Available RPC port:
9081
The /etc/ipdiva/gateway-slave/gateway.xml file would be configured as follows:
1 2 3 4 5 6 7 8 9 10 11 12 | |
Complete file
1 2 3 4 5 6 7 8 9 10 11 12 13 14 15 16 17 18 19 20 21 22 23 24 25 26 27 28 29 30 31 32 33 34 35 36 37 38 39 40 41 42 43 44 45 46 47 48 49 50 51 52 53 54 55 56 57 58 59 60 61 62 63 64 65 66 67 68 69 70 71 72 73 74 75 76 77 78 79 80 81 | |
Finally, start the Edge Gateway instance to load the new settings and connect it to the SLAVE Mediation Controller:
1 | |
Configuration of the recording service
Move the certificate for the recording service to the /etc/ipdiva/careserver/ directory with a command similar to this (replace <CERT_NAME> with the name of the intended certificate):
1 | |
Next, configure the service by modifying the following file: /etc/ipdiva/careserver/careserver.xml. The configuration of the file should be something like this (the following section omits many lines in the file marked with […]):
1 2 3 4 5 6 7 8 9 10 11 12 13 14 15 | |
Make the following changes:
- Change the listening IP address of the recording service to
0.0.0.0(listens on all available IP addresses) - Replace
recording_service.p12with the name of the certificate for the recording service - Replace
PASSWORDwith the password for the recording service certificate - Add the line
<element>http://127.0.0.1:9081</element>
Example
Taking into account the following information:
- Certificate file name:
fqdn.edge-gateway.local.p12 - Certificate password:
Str0ngP@ssw0rd
The file /etc/ipdiva/careserver/careserver.xml would be configured as follows:
1 2 3 4 5 6 7 8 9 10 11 12 13 14 15 | |
Complete file
1 2 3 4 5 6 7 8 9 10 11 12 13 14 15 16 17 18 19 20 21 22 23 24 25 26 27 28 29 30 31 | |
Validate the new settings by restarting the recording service:
1 | |
Connecting HTML5 Gateway instances
If the HTML5 Gateway instance needs to be configured, run the following command on the Edge Gateway server as root to enable automatic startup of the instance:
1 | |
Copy the certificate file from the HTML5 Gateway to the /etc/ipdiva/html5gateway/ssl/ and /etc/ipdiva/html5gateway-slave/ssl/ directories. You can do this by running commands similar to the following as root (replace <CERT_NAME> with the name of the certificate for the HTML5 Gateway):
1 2 | |
Configure the HTML5 Gateway instances to allow them to connect to the Mediation Controllers.
The configurations differ depending on the Mediation Controller to be contacted. Perform both settings:
Edit the /etc/ipdiva/html5gateway/html5gateway.xml file and complete it using the following information (several sections have been omitted and are indicated by […]):
1 2 3 4 5 6 7 8 9 10 | |
Replace the following elements:
_FILL_ME_WITH_SERVER_ADDRESS_:: must be replaced with theRIP_MED_SSL_MASTERaddress, the:character, and the SSL router's listening port, which is normally set to443keyfile.pem: must be replaced with the name of the certificate filePASSWORD: must be replaced with the certificate password
Example
Taking into account the following information:
RIP_MED_SSL_MASTERequals:10.0.10.11- SSL Router listening port:
443 - Certificate file name:
html5-gateway.p12 - Certificate password:
Str0ngP@ssw0rd
The /etc/ipdiva/html5gateway/html5gateway.xml file would be configured as follows:
1 2 3 4 5 6 7 8 9 10 | |
Complete file
1 2 3 4 5 6 7 8 9 10 11 12 13 14 15 16 17 18 19 20 21 22 23 24 25 26 27 28 29 30 31 32 33 34 35 | |
Finally, restart the HTML5 Gateway instance to load the new settings and connect it to the MASTER Mediation Controller:
1 | |
Edit the /etc/ipdiva/html5gateway-slave/html5gateway.xml file and complete it using the following information (several sections have been omitted and are indicated by […]):
1 2 3 4 5 6 7 8 9 10 11 12 | |
Replace the following elements:
@SERVER@: must be replaced with the addressRIP_MED_SSL_SLAVE@SERVERPORT@: must be replaced with the SSL router's listening port, normally set to443keyfile.pem: must be replaced with the name of the certificate filePASSWORD: must be replaced with the certificate password@RPC_PORT@: must be replaced with an available TCP port on the machine; port9089is commonly used
Example
Taking into account the following information:
RIP_MED_SSL_SLAVEis equal to:10.0.10.13- SSL Router listening port:
443 - Certificate file name:
html5-gateway.p12 - Certificate password:
Str0ngP@ssw0rd - Available RPC port:
9089
The /etc/ipdiva/html5gateway-slave/html5gateway.xml file would be configured as follows:
1 2 3 4 5 6 7 8 9 10 11 12 | |
Complete file
1 2 3 4 5 6 7 8 9 10 11 12 13 14 15 16 17 18 19 20 21 22 23 24 25 26 27 28 29 30 31 32 33 34 35 | |
Finally, restart the HTML5 Gateway instance to load the new settings and connect it to the SLAVE Mediation Controller:
1 | |
Configurations prior to connecting HTML5 Gateways
In order for HTML5 applications to work, additional settings must be configured on the Mediation Controller servers. Log in to the MASTER and SLAVE Mediations Controllers servers as root.
Create or edit the /etc/ipdiva/httpd/commonParameters.extra.conf file to add a section equivalent to the following for the HTML5 Gateway:
1 2 3 4 5 6 7 8 9 10 11 12 13 14 15 16 17 18 19 20 21 | |
Where:
URL_HTML5must be replaced with the content of theURLfield for the HTML5 Gateway configured in the administration console during the HTML5 Gateway declaration (for a cluster, this is generallyHTML5-1andHTML5-2).GW_NAMEmust be replaced by the name of an Edge Gateway located on the same server as the HTML5 Gateway. The | character at the end of the line must be kept.ORGANIZATION_NAMEmust be replaced by the name of the organization to which the previous Edge Gateway connects.
Example
For a platform with the following settings:
- Organization name:
my-organization-name - Declaration of the first HTML5 Gateway in the administration console:
- Name:
html5-gateway-1 - URL:
HTML5-1 - Protocol:
WebSocket
- Name:
- Declaration of the second HTML5 Gateway in the administration console:
- Name:
html5-gateway-2 - URL:
HTML5-2 - Protocol:
WebSocket
- Name:
- An Edge Gateway server on the first HTML5 Gateway has:
- An Edge Gateway service named
edge-gateway-1 - An HTML5 Gateway service named
html5-gateway-1
- An Edge Gateway service named
- An Edge Gateway server on the second HTML5 Gateway has:
- An Edge Gateway service named
edge-gateway-2 - An HTML5 Gateway service named
html5-gateway-2
- An Edge Gateway service named
The configuration file /etc/ipdiva/httpd/commonParameters.extra.conf created will be set up as follows:
1 2 3 4 5 6 7 8 9 10 11 12 13 14 15 16 17 18 19 20 21 22 23 24 25 26 27 28 29 30 31 32 33 34 35 36 37 38 39 40 41 42 43 | |
Before applying the new settings, you must check that the new configuration does not cause any blocking errors for the Apache2 web server.
To do this, run the following command:
1 | |
If the response is Syntax OK then the changes can be applied with the command below. Otherwise, check your configuration in the /etc/ipdiva/httpd/commonParameters.extra.conf file.
1 | |
Configuring an NTP time server
It is recommended to set up a time server to keep the system clock up to date. The necessary steps are described on the NTP configuration page.